In a previous post I talked about why I like the idea of a static site generator, and the reasons for choosing to use one. In this post I want to share how I got mine set up to basically post everything with a single git push of the source. It may not be pretty, and it most certainly is not the best way to do it, but it works for me and the proof is in the pudding as it were.
Please note that I am a total neophyte when it comes to the arcane art of CI and automated testing. (This guide is kinda hacky but for my purposes it works.)
My setup looks a little bit like this. I have my gitlab instance running on my server. It backs up to my NAS and I want to make a “gitlab-runner” that will do my build for me.
I haven’t found a good solution for my runner yet. It’s not advised to use the system your git server is running on to also be a runner. I don’t have anything set up otherwise that can be a runner so my choice is to make a docker instance of the official gitlab-runner container and run it in shell mode.
The setup
First. I’m going to want to make a user for my gitlab runner to use in git. Using your admin account is a huge security hole and we can easily get around that by making a new one. Before we rush off to the web UI, we’re going to make an rsa
key for our new user by running ssh-keygen -t rsa like this:
Generating public/private rsa key pair.
Enter a passphrase(empty for no passphrase):
Enter same passphrase again:
Your identification has been saved in /Users/john/testtt.
Your public key has been saved in /Users/john/testtt.pub.
The key fingerprint is:
SHA256:j+FL93E5e6btfzLZxkrWrZdrBkwqanJQtba1RZwROO8 runnerboi@gitlab
The key's randomart image is:
+---[RSA 2048]----+
| oo+ |
| . o + |
| . . + |
| . o . + |
| . S o B |
| . . * o E o.|
| . = + . B++|
| . = o . =+OO|
| + . . B%B|
+----[SHA256]-----+
$ cat ~/runnerboi.pub
ssh-rsa AAAAB3NzaC1yc2EAAAADAQABAAABAQCXnZZ0e0BKqH6i15DL+RO68paFABpXH+alHpAuyrhn3dtbPX0lOQJF275kt/qn8wwDRYAQvdWeTGynmj5d5ul1Fo+ONK+kPvAjX1WZowLEjsewWTHC1Qf0CtYphGoXoc1XRNPTu+wW3xPOCQQwz/gnqJeUw9bNpdj+qAo6JCkqnEb7eXWYfNWBckqgPx3R+hVDlrZxDGxoFOHQ06Wp3UkoWV5LUE1++0akjpIApU0pduX1wnBFCVH183oYuOeSftqYx7MBBGlsLO1+WNmOdaFSGqRLkrDT8e95NGdIGZuGovIRHwq+InnYOghOYQYRhgenaZw4u9Rf5hvVCMcvHHd1 runnerboi@gitlab
In the above example, we called it “runnerboi” and that generated us runnerboi and runnerboi.pub. runnerboi is your private key, which we’ll need later, and the .pub file is the public key.
Go ahead and cat that out like the last part of the example, copy it to your clipboard and continue by adding our user.

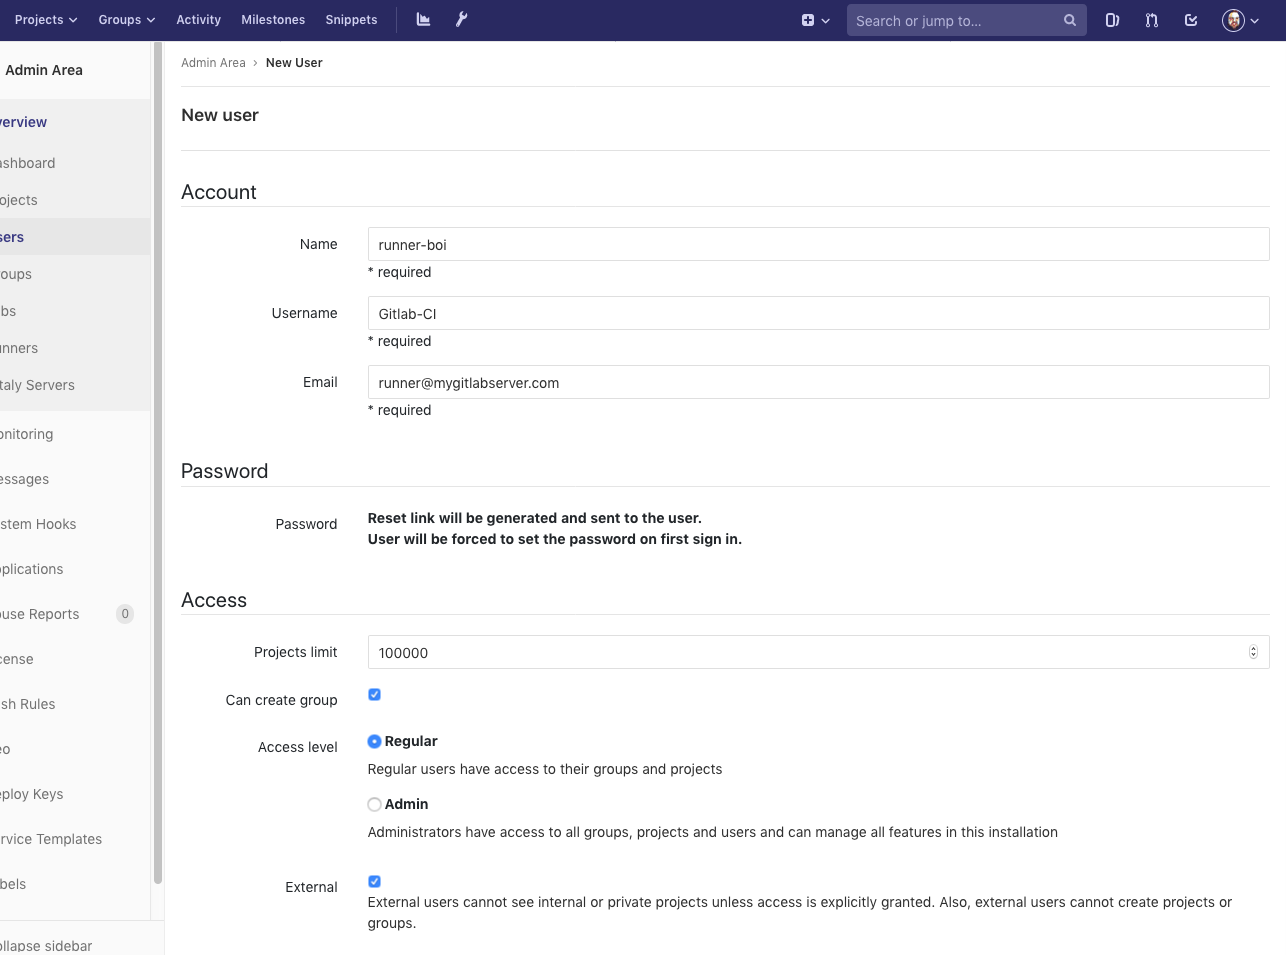
We add the user. It really doesn’t matter the username, email, name etc. We aren’t even going to verify this user. We’re never going to log in or set up a password. We’re just going to make it and use our admin superpowers to set it up.
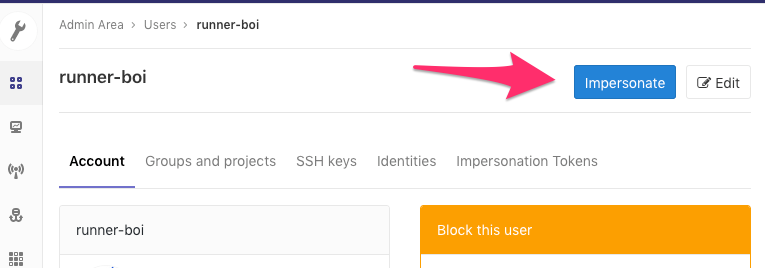
If you don’t have admin powers on the gitlab instance, I’d imagine you could do this using a legitimate email and go that way but I have no idea how you’d go about setting up a CI on that or even if it’s feasible. So for now we’re going to impersonate our new runnerboi.

Then once we’re impersonating we’re going to go to the user settings:

Next set up ssh-keys by selecting it in the side menu, pasting that previously copied public rsa key in the key field, and giving it a title (or keeping the auto generated one).

We can now add this new user to your “blogsource” repo and a new repository that I called “blog”. Set the user’s permissions to Developer. This new “blog” repo contains only the public directory and is a mirror of what you would want have deployed to the server.
I understand that hexo has some inbuilt mechanisms that are made specifically for this purpose. Just deploy on your development computer with hexo installed, and it can check your changes into your git repo. While at face value this is a pretty good feature, I would much rather make something more generic that can run through any generation script and deploy. That way if, say I decide I want to use some other SSG, I could easily modify this setup to use that instead. Aside from that, not every computer I am going to use is going to have:
- node
- npm
- Hexo
- various hexo plugins
- git
- ssh
- my ssh keys
I’d like to be able to just do a git checkout of my blogsource, modify/write some files, commit, and have my site automatically deployed. Ok, next step!
Setting up the Runner with Docker.
On our server, were going to want to pull down the gitlab-runner container we mentioned earlier. We do that by running docker pull gitlab/gitlab-runner:latest.
Next we want to make sure we have a local folder to store the gitlab-runner configurations in. On linux, I ran mkdir -p /srv/gitlab-runner/config. Now we can deploy our new container by running:
1 |
docker run -d --name gitlab-runner --restart always -v /srv/gitlab-runner/config:/etc/gitlab-runner gitlab/gitlab-runner:latest |
This will take our gitlab-runner image that we just pulled from docker, mount our folder at /srv/gitlab-runner/config to the new container’s /etc/gitlab-runner folder, set it to automatically restart if it goes down,
and finally name it gitlab-runner.
We’re going to want to go into the admin area of our Gitlab install and get a couple variables that we need to register our new runner.

Copy the registration token from here, make note of the URL, and then run the following to start setting up your runner config.
1 |
docker exec -it gitlab-runner gitlab-runner register |
You’ll be prompted like so:
Please enter the gitlab-ci coordinator URL (e.g. https://gitlab.com )
https://gitlab.yoursite.com
Please enter the gitlab-ci token for this runner
3FeWDf4gsdv-2DefS3Sfg
Please enter the gitlab-ci description for this runner
My-runnerboi
Please enter the gitlab-ci tags for this runner (comma separated):
hexo,nodejs
Please enter the executor: ssh, docker+machine, docker-ssh+machine, kubernetes, docker, parallels, virtualbox, docker-ssh, shell:
shell
Feel free to name it, tag it, describe it however you want but make sure you put shell as the executor.
Useful docker commands
Blow away the container
1
sudo docker stop gitlab-runner && sudo docker rm gitlab-runner
Just in case you need to jump in to the command line
1
sudo docker exec -it gitlab-runner bash
Back to Gitlab one final time
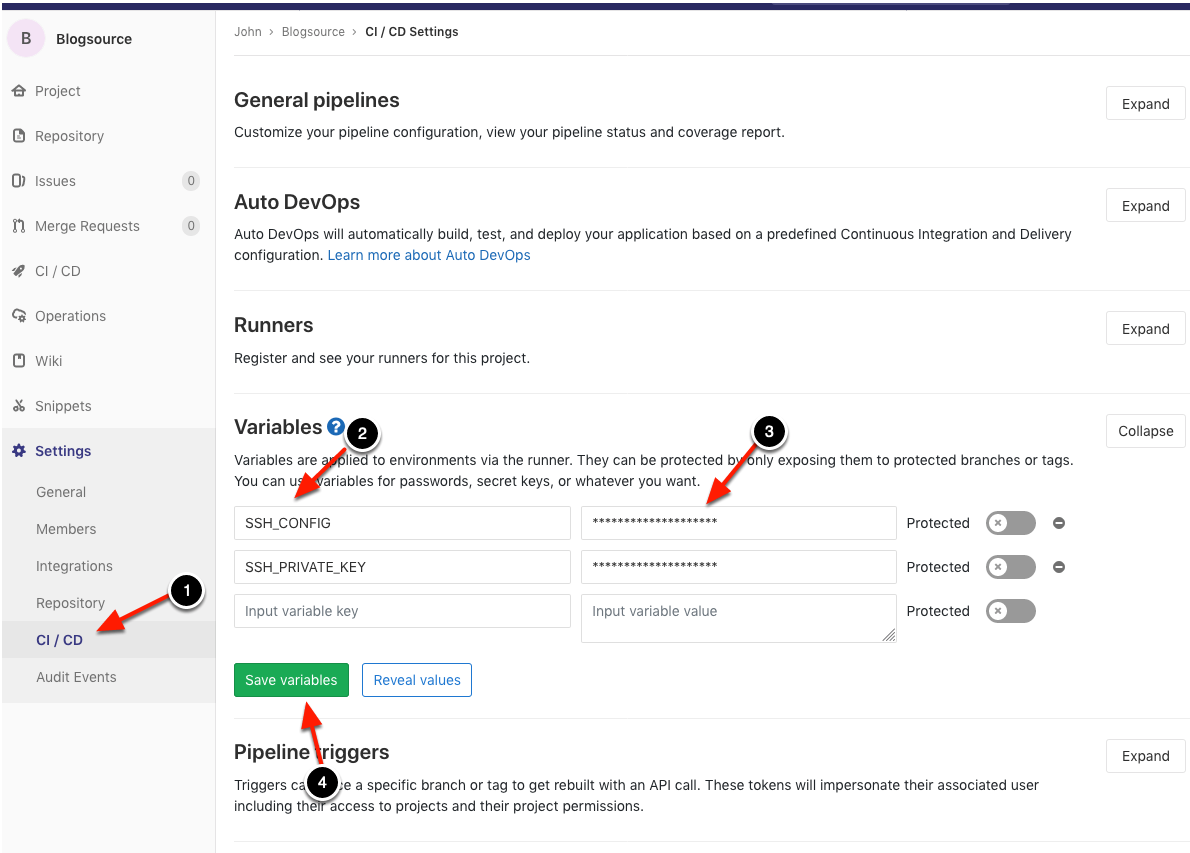
Our user is set up, our git repos have been made, and now it’s time to set up the CI pipeline variables. For this, you’re going to want to grab your private ssh key from what we generated earlier. Copy the contents of runnerboi,
the file that was generated along with runnerboi.pub, and move over to your blogsource repo’s CI/CD settings. Here we make a variable, name it SSH_PRIVATE_KEY, and paste the entire contents of that
file.

While we’re still on this page we want to add some ssh client config values. You can look more into setting up ssh configuration files in this wonderful blog post. For our purposes, we’ve set it up to ignore host key settings for every host, and set up our own gitlab server to use a specific port. If your server is visible to the internet, you’re definitely going to want to change the default port so, if you have, this is where you’d tell your runner about it.
This is what I put under the CI variable for SSH_CONFIG:Host *\n\tStrictHostKeyChecking no\n\nHost gitlab.mysite.com\n\tport 2202\n is code for making a new line and \t is code for
pressing tab. This will parse out to:
1
2
3
4
5
Host *
  StrictHostKeyChecking no

Host gitlab.mysite.com
  port 2202
Setting up the source
Everything is set up! If you’ve followed along this far you’re in the home stretch. All that’s left to do now is to set up your hexo ._config.yml file and make a new .gitlab-ci.yml file.
Hexo config
To automatically commit to your static site repo when it’s deployed, edit the hexo project’s _config.yml with the following (Obviously changing the repo url to the one you set up).
1 |
# Deployment |
This commits via ssh. The server will check the commit against your users public key that we pasted to it in the first step. By default, hexo will commit only the public directory when using this deploy method. Nothing left to set up in hexo as it will commit exactly what we want
CI config
Time to make a file in your blogsource root folder called ._gitlab-ci.yml. Mine looks a little like this.
1 |
before_script: |
before_script
In this script you’ll see the $SSH_CONFIG and $SSH_PRIVATE_KEY variables pop up again. The “before_script” is what happens before we do anything else. It’s where we make sure the system has all the tools it needs
to do it’s job. In this step we’re:
- Making sure our runner has ssh-agent which is needed for commits through ssh
- Making our ssh config file and putting our
SSH_CONFIGvariable into it. - Piping our ssh key into the
ssh-addapplication which registers it to our keychain - Checking if we have nvm and installing it if we don’t
- Checking for npm and installing nodejs (which includes npm) if it’s not there
- Installing Hexo
- Installing all the packages we need for our blog.
public
We’ve called our job “public” here. You could write anything here and that’s what the job would be named. In the “script” part of this, we’re:
- configuring our git user
- running a cleanup of any files left around.
- Checking out our most recent build
- Generating our blog with the debug setting. (This can be useful for figuring out why things aren’t working with your site.)
- Running a deploy which we set up in the hexo
._config.ymlfile.
Artifacts refer to files that get saved when a job completes and are sent back to the repo as a file. Here, we basically copy the public directory and the debug log. This I’ll be using for something in another future post.
The “only” part of this will make it only run the “public” scripts when we commit to master.
Using it.
Now we’re set up to run our build when we commit to blogsource. Commit these files and the CI should jump into action trying to build your site. Once it’s done, check your “blog” repo and you should have all your files nice and tidy. From here you can do a git clone or git pull on your live server and your site will be updated. I’m working on making this part more automated for a future post but if you’re impatient you could try something like they did in this post on digital ocean.
Back to Gitlab one final time

Add to .known_hosts in order to not get “Host key verification failed…” error
Host *\n\tStrictHostKeyChecking no\n\nHost gitlab.mysite.com\n\tport 22
This will parse out to:
1
2
3
4
5
Host *
  StrictHostKeyChecking no

Host gitlab.mysite.com
  port 22
Using it.
But really, I don’t want to have it build every commit… Sometimes I’m just editing drafts and literally nothing will change on the frontend. Well as of right now you need to add [ci-skip] to the commit message for that to happen.
Gitlab just recently started supporting push options. These allow you to pass options to your repo without fouling up your commit messages with a soup of tags and variables. There’s ongoing work in this merge request to implement that with git push -o ci-skip. Pretty interesting!
https://gitlab.com/gitlab-org/gitlab-ce/issues/14499
https://gitlab.com/gitlab-org/gitlab-ce/issues/18667
Really though, I don’t want to have it build every commit. Sometimes I’m just editing drafts and literally nothing will change on the frontend. Well as of right now you need to add [ci-skip] to the commit message for that to happen.
Gitlab just recently started supporting push options. These allow you to pass options to your repo without fouling up your commit messages with a soup of tags and variables. There’s ongoing work in this merge request to implement that with git push -o ci-skip. Pretty interesting!
https://gitlab.com/gitlab-org/gitlab-ce/issues/14499
https://gitlab.com/gitlab-org/gitlab-ce/issues/18667
That’s all folks!
As always, if you have any questions, just drop me a line and I’ll do my best to get you some answers. Have fun, keep making cool stuff and I’ll see you on the next project!